[:it]
Possiamo evitare San Valentino e procedere oltre? E vabbè, direte, ma non vi piace neanche una festa! Pfff! E’ vero, però vedrete che questa volta ho fatto qualcosa per aggirare il problema.

Mi concentravo intensamente su come poterne apprezzare almeno qualche aspetto e mi sono ricordata di aver visto una volta delle foto di valentini vecchi vecchi, strepitosi. Se avete visto anche voi il bellissimo film dedicato a Keats “Birght Star”, ve li ricorderete anche voi: dei piccoli tesori segreti in carta tutti ripiegati e decorati. Si chiamano puzzle purse e risalgono alla fine del 1700 inizio del 1800. Così sono andata a ricercarli e dopo aver perso qualche anno su Pinterest mi sono messa a farne uno anche io. Okay, ho rischiato qualche attacco isterico nel piegarlo ma alla fine è stato davvero divertente!

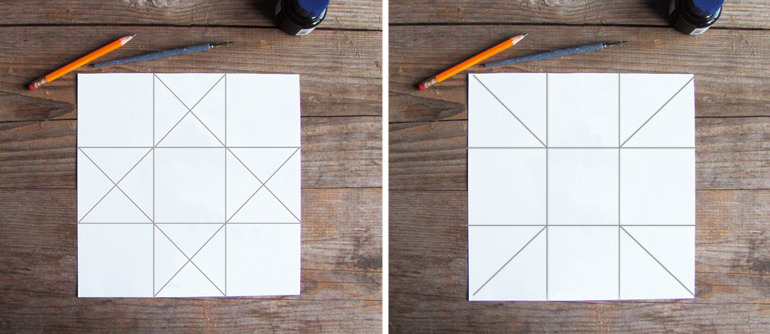
Fronte Retro
Se volete provarci anche voi, prima di tutto vi serve un quadrato di carta bianca. Ma un quadrato bello preciso, non quelli strappati o tagliati a caso come ho provato a fare io nei primi tentativi. Se prendete un foglio A4 (quelli della stampante per intenderci) ne potrete ricavare facilmente uno 21×21 cm. Sceliete un foglio piuttosto leggero (ma attenti che poi se colorate con pennarelli o colori liquidi potrebbe passare attraverso la carta), mi raccomando, non cartoncini spessi o diventerà tutto sommamente più complicato se non sarete precisissimi.
Poi dividete ogni lato in 3 parti con un righello, segnando quindi ogni 7 cm e unite facendo tipo lo schema del tris. Dividete poi i quadrati centrali di ogni lato con delle X in modo da ottenere dei triangolini. Vi serviranno solo per capire dove piegare, disegnare e scrivere quindi non calcate troppo, state leggeri con la matita. Il quadrato centrale sarà il cuore del biglietto dove disegnare o scrivere le cose più importanti. Fate lo stesso con il retro seguendo lo schema lì sopra.

Io ho scelto di disegnare prima di piegare il biglietto per poterlo fare più agevolmente e ho imitato un po’ i disegni originari… per lo meno i temi. Mi sono ispirata guardando questa board bellissima. Dai, alcuni di quegli ometti non sono bruttini da impazzire? Io trovo che facciano tantissima tenerezza!
Se volete che il risultato finale funzioni seguite il mio esempio. I motivi dei quattro triangolini esterni, come avrete notato, si ripetono: Il cuore è sempre sul vertice interno del triangolo. A questo modo i triangoli, una volta piegati, formeranno un quadrato composto in modo piacevole (lo vedrete poi nelle foto più in basso).
Potete disegnare e scrivere anche nei triangoli sul retro come ho fatto io. Poi in verità, una volta che il biglietto sarà piegato potrete disegnare e scrivere ovunque vi andrà! Scrivete seguendo un senso orario e se la vostra metà non vi sembra troppo sveglia, metteteci anche i numerini per capire bene da dove partire a leggere.
A questo punto potete seguire due strade:
– quella sbragona facile facile che vi fa fare mille pieghe come mostrato in questo video qui.
– quella da raffinati pomposi che ho provato io, sbagliando tutto e facendomi venire un attacco isterico con successiva richiesta di aiuto disperata a Luisa. Okay, io e l’origami abbiamo qualche difficoltà relazionale.

Comunque se volete proprio seguire quella da raffinati snobboni si tratta di effettuare solo le pieghe necessarie e di farle nel verso giusto di modo che il risultato finale sia più pulito e ordinato. Per riuscirci vi servirà un bone folder, aggeggino usato per la rilegatura, o in alternativa un oggetto con una punta smussata che vi segni la carta senza romperla (potrebbe essere la punta di una lima). Ed ecco qui per voi un segreto che mi ha insegnato la bravissima Paola Fagnola ad un workshop sulla rilegatura: quando fate un segno per facilitare la piegatura, poi la carta va piegata in senso contrario, opposto all’incavo che avete tracciato. Chiaro no? 😛
Quindi seguendo gli schemi qui sopra, ricalcate con il vostro bon folder le righe rosse così poi da piegarle non verso di voi ma verso il basso. Facendo una piega a montagna insomma. (AUGURI!)

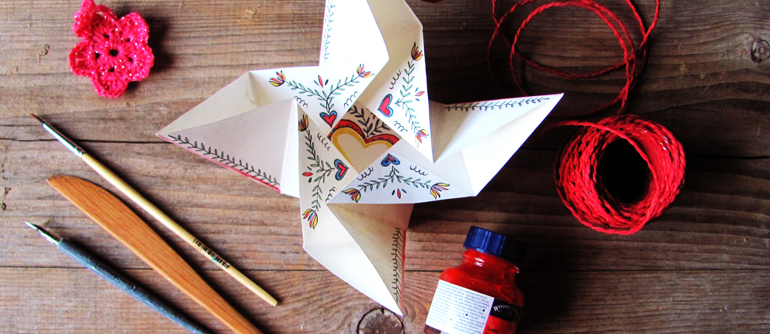
A questo punto se avete fatto tutto bene, dopo qualche minuto di tentativi, riuscirete a ripiegare il vostro bigglietto in modo che i triangoli colorati o scritti si riuniscano a formare il disegno centrale. Se il disegno centrale vi esce sbudellato, complimenti, avete ovviamente sbagliato qualcosa. Riprovate!
A questo punto avrete ottenuto una bellissima rotella ninja. Potreste anche decidere di usarla contro il vostro amato così com’è, ma se volete proseguire chiudete i triangoli sporgenti su se stessi incrociandoli di modo che il biglietto resti chiuso. Per capire come guardate la fine del video di quelli che l’hanno fatta facile.

Ora potete creare l’ultimo disegno che sarà la copertina del valentino. Ci andrebbe un grosso cuore. Che si rompe quando il messaggio viene aperto ma voi schiaffateci sopra quello che vi pare. Magari un salvadanaio per un messaggio più sottile e altrettanto deciso?
Come avrete notato io non ci ho scritto sopra niente. Quelli originali hanno delle simpatiche poesiole in rima su cuori che si spezzano e cuori trafitti e le potete trovare qui in tutto il loro splendore.
Io penso che anche per dei bambini potrebbe essere divertente, basta aiutarli con le piegature e lasciare a loro il compito di riempire tutti gli spazi con quello che più gli piace.
Non perdetevi gli aggiornamenti al negozio o al blog e iscrivetevi alla nostra newsletter![:en]Can we move forward and avoid Valentine day? Well, I can here you say, you don’t like any festivities! Pfff! It ‘s true, but you will see that this time I did something about it.

I focused intensely on how to be able to find something good about Valentine day and I suddendly remembered that I had once seen some photos of very old Valentines. If you have watched the beautiful movie about Keats “Birght Star”, you will remember them too: these small secret paper treasures folded and decorated. So I searched for them (they are called puzzle purses), and after losing a few years on Pinterest I decided to make one for myself. Okay, I risked going crazy with all the complicated folding but in the end it was real fun!

Avanti Retro
If you want to try it, first of all you will need a square of white paper. If you take an A4 sheet (the one you use to print) you can get easily one square of 21×21 cm. Choose a sheet rather thin if you want to be able to fold it properly or it will all become supremely more complicated if you are not very precise.
Then divide each side into 3 parts using a ruler, thus marking every 7 cm and draw the lines as seen in the pictures. Divide then the central squares with a X so as to obtain small triangles. You will only need them to figure out where to fold, draw and write, so no need to draw thick lines. The central square is the heart of the puzzle where to draw or write the most important things. Do the same with the back following the picture up there.

I chose to draw before folding the card to do it more at ease and I imitated a bit the original designs. I was inspired by looking at this beautiful board. Some of those drawings are totally ugly in a super cute way, aren’t they?
If you want final the result to work, follow the way I used to fill the triangles, with the edge of the sheet always on top. This way the triangles, when folded, will form a pretty square.
You can also write and draw in the triangles on the back as I did. Well, once the puzzle will be folded you can draw and write wherever you want. Write your text clockwise and if you think that your beloved isn’t too bright, just write small numbers near the text to indcate which one is to read first.
Now you can follow two paths:
– the one for dummies that makes you fold pretty much everything as shown in this video here.
– and the snobbish refined one… that I tried and that made me quite hysterical with subsequent request for help to Luisa. Okay, origami is not for me 😛

The second way requires for you to perform only the necessary folds and making them in the right way so that the final result is more clean and tidy. To succeed you’ll need a bone folder, used for binding, or alternatively an object with a blunt tip so that you can mark the paper without tearing it (could be the tip of a file). And here’s a secret for you that taught me the talented Paola Fagnola at a workshop on binding: when you make a mark for easy folding, then the paper is to be bent in the opposite direction. Clear no? 😛
So following the pictures above, trace with your bone folder only the red lines and then bend the
paper away from you. Making mountain folds, okay? (BEST WISHES!)

At this point, if you did everything right, after a few minutes of hysterical attempts, you will able to fold your puzzle so that the colored triangles or writings come together to form the central design. If the central design is a mess, congratulations, you’ve obviously done something wrong. Try to fold everything again!
At this point you will have a beautiful ninja star. You may decide to use it against your loved one as it is, but if you want to work on it a little more, fold the outer triangles on themselves so that the puzzle stay closed. To see how, take a look at the final part of the video used by those who picked the easy way.

Now you can create the final design that will be the cover of your puzzle purse. A big heart will be fine. A heart that breaks when the message is opened; but feel free to draw whatever you want. Maybe a piggy bank for a more subtle message?
As you can see I actually didn’t write anything on it because I wasn’t in a very romantic mood. The original ones actually have some funny, clever little poems that can be found here in all their glory.
I think that making puzzle purses with children could be fun too, just help them with the folds and leave to them the task of filling all the spaces with whatever they like 🙂
Hope you had fun! And sorry for my not so perfect English ;)[:]


3 comments